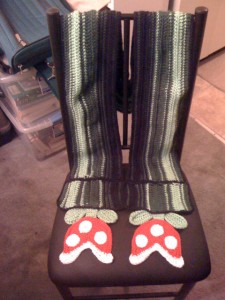
I can’t promise you that this pattern is accurate or easy to follow, but at least you guys have something to go on, right? =D
This came out way too big for me, but luckily it isn’t for me. Just hanging from my neck it hits my shins! In the picture above I have it wrapped around my neck twice.
Materials
- Worsted weight yarn (I used Caron Simply Soft) in Dark Green (DkGr), Light Green (LtGr), Black (Blk), Red, and White. For Red and White you only need small amounts of yarn. I used over 4 oz of Blk and almost 3 oz each of LtGr and DkGr.
- US size I hook (or H hook if you are a loose crocheter)
- Scissors
- Tapestry needle for weaving in ends and attaching pieces
- Moxy
Abbreviations
- ch = chain
- st = stitch
- sl st = slip stitch
- sc = single crochet
- hdc = half double crochet
- dc = double crochet
- tbc = treble crochet
- sc inc = single crochet increase (2 sc in same space)
- sc dec = single crochet 2 together
The Tube
 For most of my rows, I finished off and then went back to the beginning to join the next color so that all the color changes were on the “right” side. I had tried it going back and forth, and it looked like mess.
Ch 303. (For me, this gave me a 6 foot tube, not including the ends. Obviously this number is adjustable for your gauge.) First 3 ch counts as first dc (so dc into 4th ch from hook).
- Row 1: DkGr: dc
- Row 2: LtGr: sc
- Row 3: DkGr: sc
- Row 4: LtGr: dc, turn, dc back across for row 5.
- Row 6: DkGr: dc
- Row 7: LtGr: sc
- Row 8: DkGr: tbc, turn, dc back for row 9.
- Row 10: LtGr: sc
- Row 11: DkGr: sc
- Row 12: Blk: sc
- Row 13: DkGr: sc
- Row 14: Blk: sc
- Row 15: DkGr: sc
- Row 16: Blk: dc, turn, dc back for row 17.
- Row 18: DkGr: sc
- Row 19: Blk: sc.
sc a black border around the entire piece, including that last row of black. Make sure you do 3 sc into each corner. Finish off.
Pipe Openings (make 2)
Ch 18 (to leave you with 15 stitches).
Proceed as with the tube, with the following changes:
- Row 8.5: sc with DkGr across
- Row 9: tbc with DkGr across
Give it the same black border. Finish off.
Pin the opening to the tube with wrong sides facing so that the centers of row 8 and 9 match together. This should let the opening extend past the tube on both sides. whip stitch or sc together with black. Finish off.
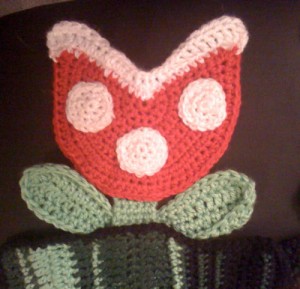
Plant Head (make 2)
This is worked like a normal flat circle would be, except you go back and forth. It is a good idea to stagger where you do your increases or you will get straight edges.
Ch 1 at the end of a row does not count as first stitch.
6 sc into magic loop.
- Row 1: sc, (sc inc) 5 times, sc. ch 1, turn.
- Row 2: sc, (sc, sc inc) 5 times, sc. ch 1, turn.
- Row 3: sc, (2 sc, sc inc) 5 times, sc. ch 1, turn.
- Row 4: sc, (3 sc, sc inc) 5 times, sc. ch 1, turn.
- Row 5: sc, (4 sc, sc inc) 5 times, sc. ch 1, turn.
- Row 6: sc, (5 sc, sc inc) 5 times, sc. ch 1, turn.
- Row 7: sc, (6 sc, sc inc) 5 times, sc. ch 1, turn.
- Row 8: sc, (7 sc, sc inc) 5 times, sc. ch 2, turn.
- Row 9: hdc, (8 sc, sc inc) 5 times, hdc. ch 2, turn.
- Row 10: hdc, (9 sc, sc inc) 5 times, hdc. Finish off.
Big Juicy Lips
This is the part that’s hard to explain what I did, because I didn’t really count, so here’s the basic idea. Make sure you leave longer tails than normal for finishing up.
- Row 1: join white to second to last st of the head with sl st. 3 sc in the “corner” stitch. sc down the straight edge, in the center whole, and back up the other side. 3 sc in the “corner” stitch (the first stitch). sl st in next st. I finished off so that the next row would be on the right side but I suppose you could ch 2 and turn if you wanted.
- Row 2: dc in each of the 3 corner stitches and in next 3 dc. hdc in the next few stitches depending on how many you have. as you near the center, switch to sc. if you think your mouth is too wide, work in some decreases here to pull it together. Switch back to hdc as you get to the other time, and then back to dc for the last 6 stitches. ch 1 and turn.
- Row 3: sc in each stitch. As you near the center, switch to sl st for a few stitches, then switch back to sc going back up the other side. Finish off.
Obviously now the ends aren’t rounded too nicely, so as you tuck in the ends pull them through the outer most edges of the mouth so you can pull it into a curve.
White Spots (make 6)
6 sc into magic loop.
- Row 1: (sc inc) around (12 stitches)
- Row 2: (sc, sc inc) around. (15 stitches)
Join with sl st and finish off. Sew on to head.
Stem (make 2)
Leave long tails for this piece.
ch 6.
- Row 1: sc in 2nd ch from hook and in each sc across. 5 sc.
Repeat row 1 until you get to 14 rows or desired length. The goal is to have enough to secure to both the head and pipe and leave a bit showing. Finish off.
Leaf (make 4)
You will want to leave long tails on this.
Ch 14.
- Row 1: dc in 3rd ch from hook and next 4 ch. 3 hdc, 3 sc, and then sl st in last chain (12 stitches). Ch 1, sl st in other side of last chain. 3 sc, 3 hdc, 5 dc. You should now be at the beginning ch 2. 24 stitches.
- Row 2: Work 2 dc in beginning ch 2 to get around to the other side. 4dc, 3hdc, 3 sc, 2 sl st. ch 1, sl st in ch 1 space, ch 1, sl st into the sl st on the other side. 1 sl st, 3 sc, 3 hdc, 3 dc, 1 hdc, join to next st with a sl st. Finish Off.
Final Touches
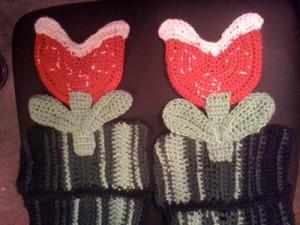
Center the stem on the wrong side of the head and pipe, pin it into place, and then sew it together.
Place the narrow side of the leaves on to the stem so that the leaves are sticking out in between the tube opening and plant head. Sew down the leaves to both the stem and the tube to keep them in place.
Strangle the person who asked you to make them a Piranha Plant Scarf.
Congratulations! You are now finished!


May 11, 2011 at 2:41 pm
WOW! This is fantastic! I would love to link to this pattern if you didn’t mind.
May 11, 2011 at 3:05 pm
Go ahead, ma’am. This is the internet. If I didn’t want people to pimp it, I wouldn’t put it up at all. :)
August 1, 2011 at 1:07 pm
Fantastic!! I’m totally going to make this.
November 23, 2011 at 5:14 pm
Thanks for sharing this! I’m going to make this for my boyfriend as a fun little gift and I was curious how much of each colour yarn I needed.. the pattern was not specific on ounces or skeins, just “yarn”. =(
Since you said you were going to be doing the chain chomp pattern, too, how much do you think you’d need for that one?
November 23, 2011 at 5:28 pm
I used caron simply soft and didn’t use an entire skein of any color, though I did use a large chunk of each of the greens. If you cast on what I did you should be fine with a skein of each of the greens and black and leftover yarns for red and white.