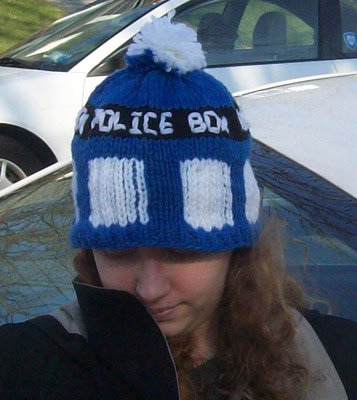
I decided one day that although many hats may have TARDISes on them, I wanted one that was a TARDIS. And of course, such a hat would probably look pretty retarded. Thus, the (re)TARDIS hat was born.
I guess this is more of a recipe than a pattern.
Finished Size:
After blocking, about 23″.
The pattern should be easily modified for other sizes.
Gauge
In stockinette
3.5 stitches per inch
4.5 rows per inch
Materials Needed
16″ 10.5 circular needle
10.5 circular DPNs
Tapestry or Darning needle for embroidering
1 skien of black yarn
1 skien of white yarn
1-2 skiens of “TARDIS blue” yarns
3.5″ pompom maker
You can do this in bulky or worsted weight yarn. If you do it in worsted, you have to double it (which is how I did the ht shown above). Both Cascade 220 and Nature Spun worsted have good blues for a TARDIS. I used a strand of each in mine.
Directions
Cast on 72 stitches. (For a tighter rib, feel free to cast on less stitches and increase later. You can see after blocking my rib isn’t as tight.)
K1 P1 around for about an inch in blue.
Knit one row around in blue. This is where you would do the increasing up to 72 stitches if you chose that route.
Follow the color chart below for about 3 inches. I did mine in fair isle and unfortunately my tension stank because I’d never done it before. Intarsia would probably work well for this hat, too, but you will have to knit it flat and then kitchener up the side.
Knit 4 rows in blue.
Knit 6 rows in black.
Finish knitting in blue until the hat raises a little bit off of your head.
Switch to DPNs and K2tog tightly around until you have 5-7 stitches left. Pull the yarn through these stitches and finish off. I recommend leaving a long tail because when I decrease this way I get holes in the top of the hat and I like to go inside and sew them shut. It’s worth it because it makes the pompom cuter.
Make a 3.5″ pompom in white (and a bit of blue if you want) to represent the light at the top of the TARDIS. I went out and bought cute little pompom makers, but TECHknitting has a great how-to for doing pompoms using cardboard circles.
Sew your pompom to the top of the hat and weave in ends.
Embroider “POLICE BOX” in the middle four rows of the 6 rows of black using a strand of white yarn. I just delegated 2 stitches per letter and it fit evenly across two “windows” and one blue strip, giving me 3 repeats. Of course if you choose a different size, you will need to recalculate.
That’s it! You’re done and you should post your finish project here or on Ravelry so I can see it! :)
Recommended Charts for Different Sizes
The chart is built to repeat 6 times, so when you adjust the size you’ll want to do it by 6 stitches. I made charts for this but didn’t test them at all.
- Chart for 78 Stitches
- Chart for 66 Stitches
- Chart for 60 Stitches
- Chart for 54 Stitches
- 48 Stitches – Use 72 stitch chart and repeat 4 times instead of 6 times.
As you make smaller hats you might want to decrease how tall the windows are a bit, and do less rows for the blue and black strips above the windows so they don’t end up wrinkly from the decreases at the top of the hat.


Pingback: It’s bigger on the inside… – D E F E C T I V E G E E K S