
Completed Sock
I really liked the idea of Franken Sock by Janine Le Cras and Yarn Yenta, but I wanted a sock that would better fit my foot and be able to incorporate a vast array of patterns. I haven’t really written a pattern before, so let me know if you have any issues.
Feel free to substitute in your own designs and please do link it to my Ravelry Entry so I know that I helped to inspire you. :)
P.S. After talking to my mom she asked me why I’d be knitting my second sock to just mirror the first. “Isn’t the point of monster socks that they’re different from each other?” So I’ll be mixing up the colors pretty good when I do sock #2! Though probably using the same patterns here, this time… But next time, who knows!

General Info:
Techniques used: knit/purl, lace, cables, mosaic, kitchener stitch
Yarn: At least 3 different colors of fingering weight yarn (but the less colors you have the more of it you will need)
Gauge: Your gauge will differ vastly as you do different types of patterns. I recommend this for more advanced knitters – knit with needles and yarn you are familiar with to get a sock that fits at 60 stitches.
Needles: This pattern is written for a magic loop circular, mainly because that way you can easily leave stitches you aren’t working with hanging about. I used size 1 but you should use whatever you normally do to get a sock that fits you at 60 stitches.
Cuff
Cast on 60 stitches. I used the yarn I had the most of, which was green.
Purl 1 row.
K2 P2 for an inch (was about 8 rows for me)
Now we do a slightly modified Double Garter border. Feel free to substitute Nancy Bush’s ‘Vikkel’ braid.

Double Garter & Cuff
Purl across, wrapping yarn twice for each stitch
M1
Knit the M1 together with the first loop of the next stitch, wrapping the yarn twice and leaving the second loop on the needle
*Knit the second loop together with the first loop of the next stitch, wrapping the yarn twice and leaving the second loop on the needle.*
Repeat from * until you only have one loop left. Knit that loop.
We use the extra stitch in the lace panel, but if you are substituting your own design feel free to K3 together at the end of the row.
Panel 1

Knit/Purl Panel
This is the knit/purl panel. For me this is green, mostly so I wouldn’t have to cut the yarn from my cuff.
K 20, knitting the two loops at a time to un-double the stitches, turn work
P 20
Work Four Corners 2 times – 38 rows
Panel 2

Cable Panel
This is the cable panel, for which I used purple. If you want to mirror your second sock, you should use this for panel 3.
K 20 from the green cuff (2 loops at a time as before), turn work
P2, K2, P2, K2, P4, K2, P2, K2, P2
Work Box Cable, with extra K2s on each end of the right side (P2s on the wrong side). Then knit rows 1-4 again (38 rows)
Panel 3

Lace Panel
This is the lace panel, for which I used yellow. This should be panel 2 if you wish to mirror your second sock.
K 20 from the green cuff (2 loops at a time), and then knit the extra stitch left over due to the M1 for 21 stitches
Purl across
Work The Vandyke Lace Panel 1 from Lace & Eyelets Harmony Guide (p 99) 6 times. On the right side K2 before and after panel, and just purl the wrong side – 38 rows.
If you don’t have the book I used you can substitute your own lace pattern. Lace Diamond Insertion would work really well because you still need 21 stitches to center it, and you only need to repeat it twice after your purl row to get to 38 rows.
For me, the panels plus the cuff are just about 5 inches at this point. If you have the yarn to make them longer, go for it!
Cut all your colors and prepare for the heel flap!
NOTICE: At this point if you want you can sew up the sides of your panels. If you are insane and want to kitchener stitch for a neat wrong-way-stitch effect, you will probably want to block the panels first. I am lazy so I just wove back and forth between the very edges of the panels. The fabric turned out pretty stretchy and I don’t think it will pucker when I block.
Heel Flap

Heel Flap
Arrange stitches on your needle so that you have 15 of the the knit/purl panel and 16 of the lace panel in back for the heel, and the rest up in front for the instep. Slip the heel stitches to the right needle and turn work to the wrong side.
I had a 4th color to join here but the color for the cable panel will work as well. Join the color to the heel stitches and purl across. Be sure to purl 2 together on the lace panel somewhere to bring the stitch count back to 30.
Continue from row 2 on of Dice Check with the colors from the knit/purl and lace panel (you just did row one).
Do 6 sets of the pattern – 36 rows total (about 2.5 inches for me, slightly stretched. It should block nicely.)
Proceed to heel turn. Use whatever color you want, but I recommend the color for you used on your instep/front/cable panel because we are continuing that design in the gusset.
I noticed that row 6 of this pattern starts with a p2. I believe this to be a typo – it should probably be a k2.
Heel Turn
- Row 1: k17 , ssk, k1, turn.
- Row 2: WS Sl1, p5, p2tog, p1, turn.
- Row 3: RS Sl1, k6, ssk, k1, turn.
- Row 4: WS Sl1, p7, p2tog, p1, turn.
- Continue this way up through row 13
- Row 14: Sl1, p16, p2tog, turn work.
- Row 15: K18
Gusset
Pick up and knit 16 stitches along the edge of the heel flap, and 1 stitch between the heel flap and instep.
K2, K1 through back loop, K2.
Continue on with the Box Cable in pattern starting at row 5 for 20 stitches, with the following changes now that we are in the round:
- Row 2, 4, 6, 8, 10: k2, p2, k2, p2, k4, p2, k2, p2, k2
- Row 12, 14, 16: Purl across
K2, K1 through back loop, K2.
Pick up and knit 1 stitch between the instep and heel flap, and 16 stitches along the heel flap.
Knit 9 stitches across the heel and place marker. This is now the beginning of the round. I like to keep all the heel/gusset stitches on Needle 1 and the instep on Needle 2.
Row 1:
- Knit to last 3 stitches on N1, K2Tog, K1.
- P2, K1 through back loop, P2.
- Continue in box cable pattern for 20 stitches.
- P2, K1 through back loop, P2.
- K1, SSK, Knit to center of heel.
Row 2:
- Knit heel and gusset stitches
- Continue instep in pattern
Repeat these two rows until you are back down to 60 stitches (30 on each needle). For me, this ended at row 11 of the box cable pattern.

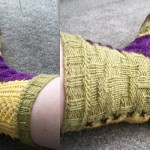
Completed Gusset
The Foot
From here I just striped yarn until I got to the toe, trying out different textures and ditching the ones I didn’t like more quickly than the others. Here’s a list of the ones I used.
- Raindrop – I suspect I was doing it wrong; it didn’t show up very good.
- Small Quilted Cross-Stitch – I really liked this one. I think I shall use it in a full sock sometime. Maybe something lightly variegated.
- Lozenge – a cute texture. Tricky to translate to be in the round though. Every even row needs knits changed to purls, purls changed to knits, and then they have to be knit backwards.
- Stripes and Bands – has the added benefit of a neat color transition on the first time around. God, I love slipped stitches
The Toe!
Begin the toe when you reach about 2 inches from the end of your foot (you may want to go to 1.5 if you are using Corn on the Cob for the toe, since the row gauge is shorter).
The center of round begins in the middle of the sole.
Row 1:
- Knit to 3 stitches before end of sole. K2tog, K1.
- K1, SSK, knit the instep to the last three stitches, K2tog, k1
- K1, SSk, knit to end of round
Row 2:
- Knit all stitches
Repeat these two rounds until you have 12 stitches left. Kitchener your stitches together. You’re done! Now make another one! =D